I have two fun cards to share with you today! The fold on this card is a little bit different than your standard card, and I created two different versions using the Snowman Season Bundle. Here's the first one:
This one has very little stamping. The snowman is punched out of Sparkle Glimmer Paper, and his eyes, nose, arms, hat, and scarf are from the Let it Snow Embellishment Kit. There are four different colors of hats and scarves, and all of them match the paper!
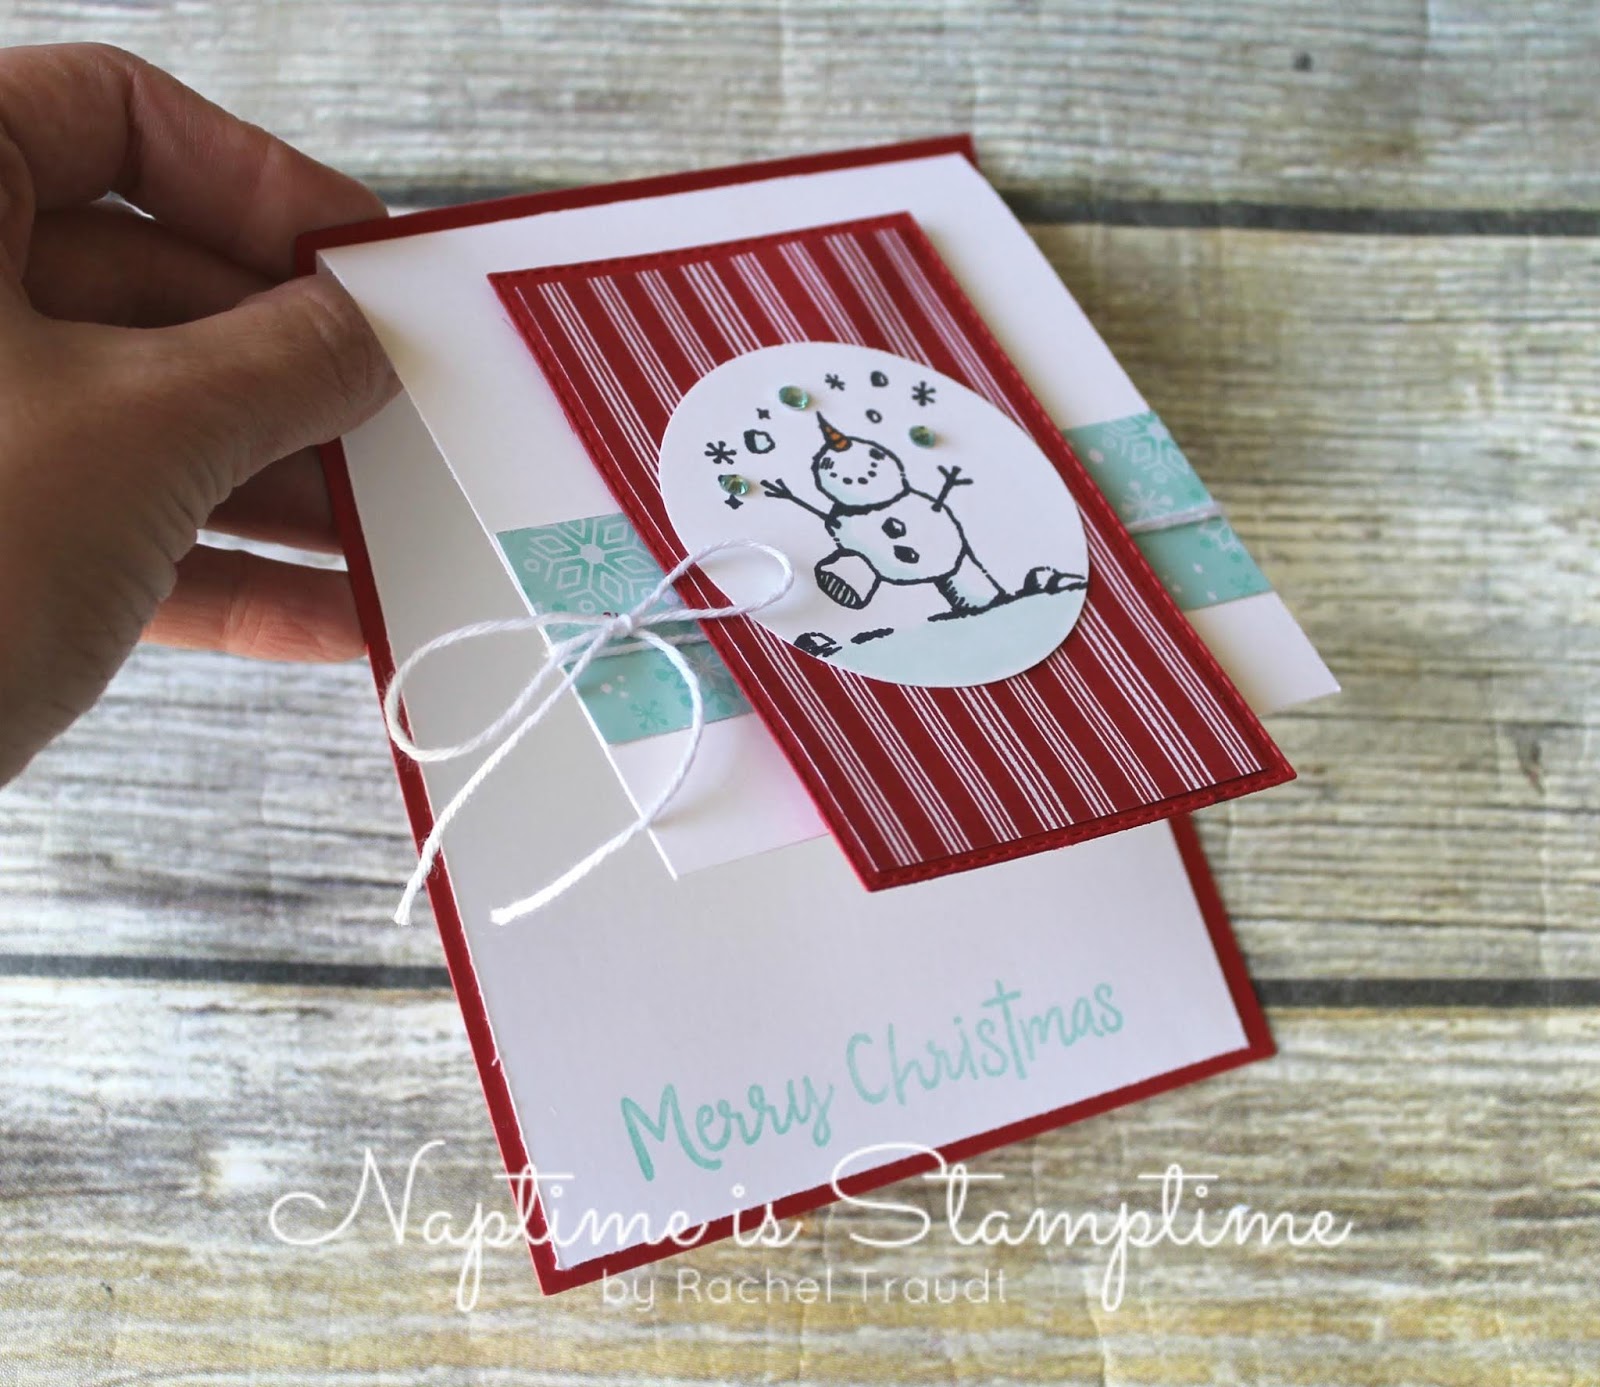
The second card is a little more involved - more stamping, and a tiny bit of coloring.
I used the Light Pool Party Stampin' Blends Marker to color shadows on the snowman. And here's a close up of that fold:
To make this type of card yourself, cut a card base 5 1/2" x 4 1/4". Then cut a piece of Whisper White 4" x 9 1/4" and score at 4". Easy peasy! You can copy one of these designs, or create your own.
Stamps: Snowman Season
Ink: Memento Black, Coastal Cabana, Shaded Spruce
Paper: Real Red, Whisper White, Let it Snow Specialty DSP, Sparkle Glimmer
Embellishments: Holiday Rhinestones, White Baker's Twine, Let it Snow Embellishment Kit
Tools: Rectangle Stitched Dies, Die Cutting Machine, Snowman Builder Punch, 2 1/4" Circle Punch
Adhesives: SNAIL, Stampin' Dimensionals
Happy Stamping!
Rachel
The color challenge at Global Design Project this week was the starting point for today's card.
I will admit, the Flirty Flamingo was a little bit of a stretch - I wanted to use the Nature's Beauty stamp set because I'm featuring it on my Facebook page this week. What do you think - does it work?
I paired the Nature's Beauty stamp set with a sentiment from the Hold On to Hope stamp set, and I think it is perfect! I shared this card on a Facebook Live. You can see it here if you'd like.
Stamps: Nature's Beauty, Hold On to Hope
Ink: Crumb Cake, Mossy Meadow, Memento Black, Stampin' Blends: Dark Flirty Flamingo
Paper: Crumb Cake, Mossy Meadow, Whisper White
Embellishments: Pearlized Doilies, Magnolia Lane Ribbon Combo Pack
Tools: Versamark, White Embossing Powder, Heat Tool
Adhesives: SNAIL, Mini Glue Dots, Stampin' Dimensionals
Happy Stamping!
Rachel
Today's card uses just about everything from the limited time Christmastime is Here suite of products. This stamp set is really unique - the large rose image is a cling stamp, and all of the other stamps are photopolymer. You have lots of options for coloring that large image - Stampin' Blends, watercolor, or what I chose to do for this card - use the "fill in" stamps. It's easy to be an artist just with your stamping!
I also used the Christmastime is Here Designer Series Paper, the Gold Glitter Enamel Dots, and the Roses Dies. These products are so pretty, it's not hard to make a beautiful card! If you like them, make sure to add them to your collection soon - all of these products are available only while supplies last.
Stamps: Christmas Rose
Ink: Memento Black, Cherry Cobbler, Early Espresso, Old Olive, Poppy Parade
Paper: Cherry Cobbler, Whisper White, Christmastime is Here Specialty DSP
Embellishments: Gold Glitter Enamel Dots
Tools: Roses Dies, Die Cutting Machine
Adhesives: SNAIL, Stampin' Dimensionals
Happy Stamping!
Rachel
Hello, and thanks for stopping by today! Can you believe it's November? I can't! Christmas is right around the corner, and the colors at Global Design Project this week were the perfect inspiration for a Christmas card.
I paired these colors with the Stitched Stars Dies and the Greatest Part of Christmas stamp set (a host set).
The Noble Peacock Foil adds just the right amount of shine! I hope you enjoyed my card today. This post needs to be quick, because nap time is already over, and it will soon be time for school pick up. It feels like the craziness of the holiday season is already starting - anyone else?
Stamps: Greatest Part of Christmas
Ink: Lovely Lipstick
Paper: Smoky Slate, Whisper White, Lovely Lipstick, Noble Peacock Foil
Embellishments: Rhinestones, Silver Metallic Thread, Lovely Lipstick Grosgrain Ribbon
Tools: Stitched Stars Dies, Stitched Shapes Dies, Pinewood Planks EF, Die Cutting Machine
Adhesives: SNAIL, Stampin' Dimensionals, Mini Glue Dots
Happy Stamping!
Rachel
Today I am sharing a card inspired by this week's TGIF Challenges sketch challenge.
The stripes in the sketch immediately made me think of the striped silver foil pattern in the Feels Like Frost DSP pack. So I started there, and here's what I came up with:
I really like the color combination of Purple Posy, Night of Navy, Whisper White, and Silver, don't you? To create that look with the Silver Thread, wrap the thread around four fingers a number of times. Pinch in the middle to create a bow of sorts, then attach with a glue dot.
I also did a second card with different patterns in the package. This one is just a little simpler because I left off the thread and twine.
Which version do you like better? Both cards are pretty simple, but that paper makes them special. Add it to your next order so that you can make easy and beautiful Christmas cards too!
Stamps: So Many Stars
Ink: Purple Posy
Paper: Purple Posy, Whisper White, Silver Foil, Feels Like Frost Specialty DSP
Embellishments: 2019-2021 In Color Faceted Dots, Rhinestones, Silver Metallic Thread, White Baker's Twine
Tools: Stitched Shapes Dies, Layering Ovals Dies, Die Cutting Machine
Adhesives: SNAIL, Stampin' Dimensionals, Glue Dots
Happy Stamping!
Rachel
Today I have a bit of an unlikely pairing for you - the Monster Bash DSP and the brand new Christmastime is Here suite! This card all started with the sketch challenge at Global Design Project this week:
I knew I wanted to use one of the patterns in the Monster Bash pack for a Christmas card, and originally I planned to use the Christmas Gleaming stamp set. However, on the day I was designing the card, the order with my Christmastime is Here products arrived, and I decided to use them instead!
This suite of products is only available to demonstrators right now. It will be available to customers in November. If you just can't wait, you can also add it to a starter kit this month! Now let's take a closer look at the card - I fussy cut the roses from the Christmastime is Here Specialty paper. Notice the gold foil - so pretty! There is just a peek of the Gold Shimmer Ribbon and a sprinkling of Gold Glimmer Enamel Dots. The sentiment comes from the Christmas Rose stamp set, and it is cut out with the Roses Dies.
This suite of products is so pretty, I know you will want to have it in your collection! Mark your calendar for November 1, or purchase it now as part of your starter kit. Thanks for stopping by today!
Stamps: Christmas Rose
Ink: Basic Gray
Paper: Whisper White, Poppy Parade, Monster Bash DSP, Christmastime is Here Specialty DSP
Embellishments: Gold 1/4" Shimmer Ribbon, Gold Glitter Enamel Dots
Tools: Roses Dies, Die Cutting Machine
Adhesives: SNAIL, Stampin' Dimensionals
Happy Stamping!
Rachel
I have a fun card to share with you today! This was one of the swap cards I made for a Holiday Catalog swap I was a part of.
That chicken will probably make its way onto a few more cards before the season is done! This time I used it with a Valentine's theme, as it is intended. The Be Mine Stitched Dies paired perfectly, and the Pinewood Planks embossing folder added a nice background piece.
I used my Stampin' Blends to color the chicken. So many ways to go, but I chose Cajun Craze this time. Here's a close up of the coloring:
Leave a comment and let me know what you think of this card. This stamp set is so much fun to color!
Stamps: Birds of a Feather
Ink: Memento Black, Real Red, Stampin' Blends: Light & Dark Cajun Craze, Dark Mango Melody, Dark Real Red, Ivory
Paper: Real Red, Whisper White, Mango Melody
Embellishments: White Baker's Twine
Tools: Pinewood Planks EF, Be Mine Stitched Dies, Die-Cutting Machine
Adhesives: SNAIL, Stampin' Dimensionals, Glue Dots
Happy Stamping!
Rachel
I have been wanting to try a pocket card for a long time, so I challenged my team to make one. Of course I had to make one too!
Pocket cards are kind of fun, and not that hard to put together. I watched this video from Wendy Cranford to get some measurements and instructions. And the color combination came from a challenge in my business training group. (Talk about killing a lot of birds with one stone!)
More pocket cards are in my future - stay tuned!
Stamps: Gather Together
Ink: Merry Merlot, Pear Pizzazz
Paper: Pretty Peacock, Pear Pizzazz, Whisper White, Come to Gather DSP
Embellishments: Old Olive/Pretty Peacock 3/8" Reversible Ribbon
Tools: Gathered Leaves Dies, Die Cutting Machine, 1 1/2" Circle Punch, Circle Tab Punch
Adhesives: SNAIL, Stampin' Dimensionals
Happy Stamping!
Rachel
Hello! I am so excited to share this card with you today! Earlier this month, I was chosen as a challenge winner at the Global Design Project. Because I won, I get to be a guest designer for their color challenge this week.
I don't know why, but the first thing I thought of when I pictured these colors together was a Christmas card using the Cup of Christmas Bundle. So that's what I did, and I am so pleased with how it turned out!
This stamp set is really fun - it has a few REVERSIBLE stamps in it! I didn't use them on this card, but isn't that genius? The coordinating dies are great too - I love the candy canes that I've used on this card.
There are lots of little details on this card - the watercolor wash on Shimmery White Cardstock adds just a little sparkle, the candy canes are arranged to form a heart, and the rhinestones are colored with the Dark Call Me Clover Stampin' Blends Marker to match.
Thanks so much for stopping by today, especially if this is your first time visiting my blog. If you like what you see, I invite you to join me on Facebook for more stamping fun!
Stamps: Cup of Christmas
Ink: Blueberry Bushel, Stampin' Blends: Dark Call Me Clover
Paper: Blueberry Bushel, Call Me Clover, Real Red, Whisper White, Shimmery White, Sparkle Glimmer Paper
Embellishments: Rhinestones, White Baker's Twine
Tools: Aquapainter, Versamark, White Embossing Powder, Heat Tool, Cup of Cheer Dies, Die Cutting Machine
Adhesives: SNAIL, Stampin' Dimensionals, Tombow Multipurpose Glue, Glue Dots
Happy Stamping!
Rachel
I have a super cute Halloween card to share with you today! I am not big on Halloween, but I kind of love how this turned out!
I fussy cut the image from the Monster Bash DSP, and it is framed with a few Holiday Rhinestones. The bats and sentiment are from the To Every Season stamp set. And that background? Pigment Sprinkles of course! The card is finished off with some Black Glittery Organdy Ribbon.
Now to find someone to send this to... does anyone send Halloween cards? I never have, but wouldn't this card be a fun surprise in your mailbox?
Stamps: To Every Season
Ink: Memento Black
Paper: Basic Black, Watercolor Paper, Whisper White (inside), Monster Bash DSP
Embellishments: Black Glittery Organdy Ribbon, Holiday Rhinestones
Tools: Pigment Sprinkles, Aquapainter
Adhesives: Stampin' Dimensionals
Happy Stamping!
Rachel
I have a Christmas card to share with you today! When I started working with the Stitched Lace Dies, I had the idea to use them for a Christmas card. Here's what my idea turned into:
To created the stitched look on the front of your card, cut your card base 4 1/4 x 11". I always score my card bases, but you can also fold it in half. Just make sure to have that line so that you know where to line up the die. Place the large stitched lace die on top of your card front, lining it up with your score or fold line. Five seems to be the magic number on my die cutting machine for running this die through and having it come out pretty easily. Then I used the Take Your Pick Die Brush Tip again, and most of the little pieces came out. Next, line up the edge die, and run through your die cutting machine. I used a little washi tape to hold it in the right place. You can layer cardstock or DSP underneath - cut to 5 1/2 x 4 1/4" and attach with Multipurpose Glue or the Fine Tip Glue Pen.
The sentiment comes from the Itty Bitty Christmas stamp set, which is full of Christmas greetings. I layered the sentiment with the Layering Circles Dies and the Story Label Punch.
Thanks for stopping by today! Leave a comment and let me know what you think of this card.
Stamps: Itty Bitty Christmas
Ink: Cherry Cobbler
Paper: Shaded Spruce, Whisper White, Wrapped in Plaid Specialty DSP, Gold Foil
Embellishments: Shaded Spruce/Gold 3/8" Striped Ribbon, Holiday Rhinestones
Tools: Stitched Lace Dies, Layering Circles Dies, Die Cutting Machine, Story Label Punch
Adhesives: Tombow Multipurpose Glue, SNAIL, Stampin' Dimensionals
Happy Stamping!
Rachel
Today I am playing along with the sketch challenge at TGIF Challenges. It's nice and simple, which I love!
I knew I wanted to use the Stitched Lace Dies for the circle, but other than that, this card turned out completely different than what I had planned in my mind. That's ok - it gave me an idea for a different card to share with you later this week. Here's what I came up with:

The Stitched Lace Dies are not for the faint of heart! Using them requires some patience, but if you use them for a smaller area, like the circle on this card, it's not so bad. I've used them a few times, and running the die through your die-cutting machine multiple times is a must. Three times worked ok, but I did five cranks back and forth for this card, and that was even better. I also highly recommend using the die brush attachment for the Take Your Pick Tool to get all of those little pieces out. Doing those two things, I only had to push two small pieces out when I was done. Note that I also cut the circle out first, and then ran it through with the Stitched Lace Dies. Here's a close up of that detail - it really is a pretty die!
I'll be back on Thursday with more tips for using the Stitched Lace Dies. I hope you enjoyed my card!
Stamps: A Little Lace
Ink: Night of Navy
Paper: Night of Navy, Very Vanilla, Sahara Sand
Embellishments: Designer Elements, Linen Thread, Denim Ribbon
Tools: Stitched Lace Dies, Take Your Pick Die Brush Tip, Die Cutting Machine
Adhesives: Tombow Multipurpose Glue, SNAIL, Stampin' Dimensionals
Happy Stamping!
Rachel
Today I am sharing my top ten favorites from the 2019 Holiday Catalog. I may have cheated a little and added a few suites and bundles to my list. But really, who can pick just ten items from this amazing catalog?! Stampin' Up! has really done a good job this year - this might be my favorite Holiday Catalog of all time! So here we go - these are in no particular order:
1) Let it Snow Suite Bundle - $132.50 - #153386
This was the first thing to catch my eye! I have always loved snowmen, and the mini curvy keepsake die is a must have!
2) Come to Gather DSP - $11.50 - #150454
If you've been following along this week, you can see why I love this paper. So many pretty patterns!
3) Holiday Rhinestones - $6.00 - #150457
What's not to love about something sparkly?! These come in some of my favorite colors, including Coastal Cabana and Night of Navy!
4) Itty Bitty Christmas stamp set - $22.00 - #150513
This one does come in a bundle with dies if you'd like, but I think the stamp set can stand by itself and be used with ANY paper and embellishments!
5) Feels Like Frost Specialty 6 x 6" DSP - $14.50 - #150444
The photo-realistic images on this paper are beautiful, but flip it over, and the silver foil patterns are just as pretty, if not more! The photo REALLY does not do justice on this one!
6) Wrapped in Plaid Specialty 6 x 6" DSP - $14.50 - 149596
The paper this year is just SO good! This one includes gold foil, and it's classic Christmas colors in plaid - GORGEOUS!
7) Come to Gather Ribbon Combo Pack - $9.00 - #150456
If you love the Magnolia Lane Ribbon Combo Pack in the Annual Catalog, you will love this ribbon too! It's perfect for all of your fall projects, and with ribbon and twine, you have variety!
8) Brightly Gleaming Specialty DSP - $14.50 - #150429
I know, I know, another paper. But this one has copper foil, and those metallic are just the best! Add in some non-traditional Christmas colors, and I just love the combination!
9) Snowflake Sequins - $6.00 - #150443
Sequins are my favorite embellishment lately, and these are perfect for all of those snowmen projects! They are also meant to fill those cute snow globe shakers.
10) So Many Stars Bundle - $57.50 - #153016
Ahh! If you have been around very long, you know that I love all of the stitched dies. So stitched stars are definitely at the top of my list! These stars will work for projects outside of Christmas too, and I hope they stick around past December.
So there you have it. What made your top ten this year? Leave a comment and let me know!
Happy Stamping!
Rachel