Saturday, November 19, 2022

#GDP369: One More Fall Card

This week's challenge at Global Design Project is a color challenge. Such a pretty combination, don't you think?


I thought I was done with fall cards, but the Pumpkin Pie in this combination convinced me to make just one more. Take a look:
 

The Hello Harvest Bundle has been popular this year, and it's easy to see why. The sentiment I used on this card is my favorite in the set, and I just love the flowers that fit right on top of the pumpkin!
 

A few more details:
  • I used the Deckled Rectangles Dies to cut out the white piece. These are quickly becoming one of my favorite die sets!
  • I colored a few Adhesive-Backed Seasonal Sequins with my Dark Balmy Blue Stampin' Blends Marker. The color stuck just enough to create a perfectly matched embellishment!

Here is a full list of products used on this card:
Stamps: Hello Harvest
Ink: Night of Navy, Memento Black
Stampin' Blends Markers: Pumpkin Pie, Balmy Blue, Night of Navy, Soft Suede
Paper: Night of Navy, Balmy Blue, Basic White
Embellishments: Linen Thread, Adhesive-Backed Seasonal Sequins
Tools: Rustic Pumpkin Dies, Deckled Rectangle Dies, Stampin' Cut & Emboss Machine
Adhesives: Stampin' Seal+, Stampin' Dimensionals, Mini Glue Dots
 
Happy Stamping!
Rachel 

Wednesday, November 16, 2022

#TGIFC394: So Lucky to Call You Friend

I am playing along with the sketch challenge at TGIF Challenges this week. It's a fun one!
 

I'm featuring the Handmade Wishes Bundle on social media this week, and I had a fun idea to use the Handmade Tag Punch as my "shape" along the left side of the card. I discovered that the shape of the punch works very well with the Lovely Linen Designer Series Paper and Quatrefoil Tile Embossing Folder.
 

The sentiment on my card comes from the Framed Florets stamp set, an early release from our upcoming 2023 January-April Mini Catalog.
 

I finished the card off with some Linen Thread and Brushed Metallic Dots. This card is super simple, but so elegant!
 

Here is a full list of products used:
Stamps: Framed Florets
Ink: Night of Navy
Paper: Night of Navy, Basic White, Lovely Linen Designer Series Paper
Embellishments: Linen Thread, Brushed Metallic Adhesive Backed Dots
Tools: Handmade Tag Punch, Quatrefoil Tile Embossing Folder, Stampin' Cut & Emboss Machine
Adhesives: Stampin' Seal+, Stampin' Dimensionals, Mini Glue Dots
 
Happy Stamping!
Rachel  

Friday, November 11, 2022

#GDP368: Gingham Christmas

Time to play along with another Global Design Project challenge! This week the challenge is CASEing the designer, Stesha Bloodhart. I always love her work! Here is the card to CASE:


I chose to follow her layout pretty closely, and I used a Kraft note card and Kraft Paper to mimic the Crumb Cake she used on her card. I distressed the edges of the Kraft Paper with my Paper Snips. I think that's the first time I've tried that technique, and I really like it!


I paired the Kraft with the Gingham Cottage Designer Series Paper and the Spruced Up Bundle. This card is simple and sweet!
 

Here is a full list of products used:
Stamps: Spruced Up
Ink: Real Red
Paper: Kraft Note Cards & Envelopes, Kraft Paper, Basic White, Real Red, Gingham Cottage Designer Series Paper
Embellishments: Brushed Metallic Dots, Baker's Twine Essentials Pack, Simply Elegant Trim
Tools: Paper Snips, Spruced Up Outlines Dies, Stylish Shapes Dies, Stampin' Cut & Emboss Machine
Adhesives: Stampin' Seal+, Stampin' Dimensionals, Mini Glue Dots, Multipurpose Liquid Glue
 

Happy Stamping!
Rachel

Monday, November 7, 2022

Fitting Florets Card Class

The Fitting Florets Collection has just been released from Stampin' Up!, and I have created a card class using products from this suite. It's really a beautiful collection!


In this card class through the mail, you'll make 12 cards - 2 each of 6 designs. The cards will feature products from the Fitting Florets Collection. When you purchase the class, you'll receive a half package of the Fitting Florets Designer Series Paper, a package of Gold Adhesive-Backed Swirls, and the cardstock and paper pieces cut and ready for you assemble your cards, plus envelopes and a PDF tutorial. You will need the Framed Florets Bundle to complete your cards. (Anything stamped and die cut from this bundle you will do yourself. Cardstock will be provided.) You will also need the following inks: Evening Evergreen, Night of Navy, and Memento Black, plus these Stampin' Blends Markers: Balmy Blue, Evening Evergreen, Polished Pink, and Soft Succulent. You have the option to add on any of these items at catalog cost to your class kit, and I will include them in your package.
This class is $26 plus $10 shipping. There is also a tutorial only option for $15. Please fill out the form at the link below and I will send you a personalized invoice to the email address you provide. The deadline to sign up for this class is November 16. Class kits will ship on November 22, and the tutorial will be emailed that day as well.
Several of the items in this collection are while supplies last, so if you are interested in this class, please sign up sooner than later as I will be ordering every few days to hopefully avoid items going out of stock. And of course if items do sell out, I will have to close the registration for the class.
Click here to sign up.
 
Happy Stamping!
Rachel  

Sunday, November 6, 2022

Creation Station: Fun & Fancy Folds

It's the first Sunday of the month, and time for another Creation Station blog hop! This month's theme is Fun & Fancy Folds.


For my project, I created a card using one of my very favorite fun folds. I love this fold for two reasons:
  1. It's easy!
  2. It really shows off the Designer Series Paper.


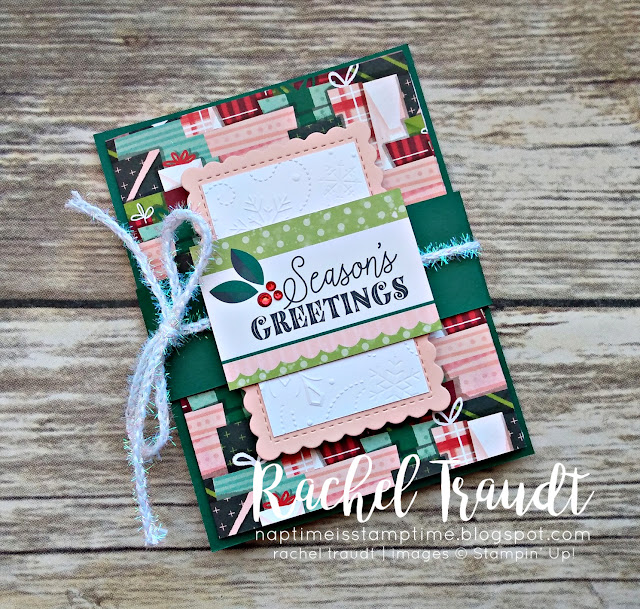
Start with a piece of coordinating cardstock that is 4 1/4" x 5 1/2". Pick your favorite Designer Series Paper and cut to 5 1/4" x 11 1/2". Score on the long side at 3 1/2" and 7 1/2". You'll adhere the middle section to your cardstock. Fold the slightly shorter piece in first, and then the last section will fold over the top and you should have an even edge of your cardstock on all sides. 
 

I chose to use the Santa Express Memories & More Cards to decorate the inside of my card. Perhaps you noticed, but there is actually no stamping on my card today! Fancy does not have to take long or require many products.
 

For the front of the card, I cut a cardstock belly band that measures 1 1/2" x 9 1/2". You can play around with the width of the band depending on how you want the front of your card to look. I used the Scalloped Contours Dies and cut the greeting from another Memories & More card for my focal point. The Rhinestones are colored with the Dark Poppy Parade Stampin' Blends Marker so that they match the red in the paper.


If you like this card, make sure you've joined my email list. I've been treating my email subscribers to a 12 Weeks of Christmas video and tutorial series, and next week I'll be sharing some different versions of this card. 
 
Thank you for stopping by today. It's time to hop along to the next designer! I'm sure Julie Beltramo has designed something beautiful to inspire you.


Happy Stamping!
Rachel 

Friday, November 4, 2022

#GDP367: Have Yourself a Merry Little Christmas

Merry Christmas! Now that Halloween is over, Christmas is everywhere, and I can't say that I'm upset about it. I love Christmas! This week's theme challenge at Global Design Project was perfect for another Christmas card.
 

I went with a non-traditional color scheme of black, white, and pink. While traditional Christmas colors are good, sometimes I like non-traditional colors even better! 
 

My trees come from the Celebrate Everything Host Designer Series Paper. This paper has so many fun patterns, and several black and white designs that you can add color to if you'd like! I used my Dark Polished Pink Stampin' Blends Marker to add some pink to a few of the trees.
 

A few other details to love about this card:
  • the sentiment from the Framed & Festive stamp set
  • a little stitched detail from the Stitched With Whimsy Dies
  • Black & White gingham ribbon
  • some sparkle from White Glimmer Paper
  • a Wonderful Snowflake peeking out from behind the sentiment
  • Polished Pink Opal Rounds to match the rest of the pink on the card

Here is a full list of products used on this card:
Stamps: Framed & Festive
Ink: Polished Pink
Stampin' Blends Markers: Dark Polished Pink
Paper: Thick Basic White, Basic White, Basic Black, Polished Pink, Real Red & White 6" x 6" Glimmer Paper, Celebrate Everything Host Designer Series Paper
Embellishments: 2021-2023 In Color Opal Rounds, Black & White Gingham Ribbon, Wonderful Snowflakes
Tools: Stitched With Whimsy Dies, Stampin' Cut & Emboss Machine
Adhesives: Stampin' Seal+, Stampin' Dimensionals, Mini Glue Dots, Multipurpose Liquid Glue
 

Happy Stamping!
Rachel 

Friday, October 21, 2022

#GDP365: Happy Christmas

This week's challenge at Global Design Project is a color challenge.
 

These colors screamed Christmas to me, and you all know how I love to make Christmas cards, so here's what I came up with:
 

I used the Spruced Up Bundle with the Whimsical Wonderland embossing folder in the background.


I just love how this card turned out, and I hope you do too! Here is a full list of products used:

Stamps: Spruced Up
Ink: Petal Pink, Soft Succulent, Sweet Sorbet
Paper: Soft Succulent, Sweet Sorbet, Basic White, Petal Pink
Embellishments: Wonderful Snowflakes, Adhesive-Backed Seasonal Sequins
Tools: Stylish Shapes Dies, Spruced Up Outlines Dies, Whimsical Wonderland 3D Embossing Folder, Stampin' Cut & Emboss Machine
Adhesives: Stampin' Seal+, Stampin' Dimensionals, Multipurpose Liquid Glue
 

Happy Stamping!
Rachel

Wednesday, October 19, 2022

#TGIFC390: Fall Sketch

This week's challenge at TGIF Challenges is a sketch challenge.
 

I played along with the Fond of Autumn Bundle, and this card has all of the fall colors I love!


The large floral image in the Fond of Autumn stamp set is so fun to color! I used a combination of Cajun Craze, Pale Papaya, and Pumpkin Pie on the leaves, and So Saffron for the flowers. I stamped the large floral image, and then die cut with the large die that cuts the image into pieces. I also did a little more snipping to use just the pieces I wanted to fit around my focal point.
 

Don't you just love those embossed leaves?! The Leaf Fall 3D Embossing Folder is a hidden gem in the catalog!


Here is a full list of products used.
Stamps: Fond of Autumn
Ink: Memento Black, Early Espresso
Stampin' Blends Markers: Cajun Craze, Pale Papaya, Light Pumpkin Pie, Soft Suede, So Saffron, SU100
Paper: Cajun Craze, Pale Papaya, So Saffron, Basic White
Embellishments: Leaf Label & Amber Gem Combo Pack
Tools: Leaf Fall 3D Embossing Folder, Penned Flowers Dies, Layering Circles Dies, Autumn Bouquet Dies, Stampin' Cut & Emboss Machine
Adhesives: Stampin' Seal+, Stampin' Dimensionals, Multipurpose Liquid Glue
 
Happy Stamping!
Rachel  

Sunday, October 2, 2022

Creation Station: Tweets & Treats

I am so excited to be joining the Creation Station Design Team! We hop on the first Sunday of every month, and this month's theme is Tweets & Treats.
 

The only guidelines were a 3D project, not a card. I chose to interpret the "tweet" part very literally and included a sweet little bird in my project.
 

I am a card-maker at heart, and 3D projects need to be quick and easy (and copied from someone else) if I'm going to do them. This candy bar holder is extremely easy and one I learned a year or two ago. All you need is a 6" x 6" piece of patterned paper. Use a strong adhesive, such as Tear & Tape, and apply on two adjacent sides.
 

Wrap the paper around the candy bar, sealing with your adhesive and then pressing the bottom together to seal as well. This will work with any candy bar that is relatively flat. I've used a Hershey bar in this case, but my favorite at this time of year is the king size Reese's pumpkins.
 

While the project itself is simple, I've added some fun details to the tag. I combined two stamp sets - Sweet Songbirds and Best Witches - to create the bird with the witch hat. I masked one of the witch stamps to get just the hat and then fussy cut it and fit it on the bird. 
 

The Adhesive-Backed Stars reminded me of little sparks flying from a spell to go along with the sentiment, "You've put a spell on me." I colored them with my Dark Daffodil Delight Stampin' Blends Marker to match the rest of the project.
 

And did you know that you can add color to our vanilla glimmer paper?! This paper is part of a pack with three colors, and the vanilla takes color really well! 
 

I added Orchid Oasis with my Blending Brush. I realized later on that we have Orchid Oasis glimmer paper in another pack... oops! But this was still a good discovery because now I can create any color of glimmer paper that I want. You will want to let the ink dry a little bit, and you will need to use Multipurpose Liquid Glue to adhere it because any other adhesive slips right off.
 

I hope you have enjoyed my project today, and thank you for hopping along! Next up is the talented Yvonne Spikmans - Van Bruggen!
 

Happy Stamping!
Rachel